TABLE OF CONTENTS
- How to Fully Purge Medal for a Clean Installation
- Step 1: Locate your Medal folder
- Step 2: Back Up Your Clips
- Step 3: Uninstall Medal
- Step 4: Remove Remaining Files
- Step 5: Restart Your PC
- Step 6: Reinstall Medal
- Step 7: Restore Your Backup (If Needed)
- Important Notes
How to Fully Purge Medal for a Clean Installation
If you're experiencing issues with Medal (such as clips not saving, the app not opening, or general instability), performing a clean purge can help resolve these problems.
Before proceeding, it’s very important to back up your clips properly, as the steps differ depending on which version of the Library you are using.
Step 1: Locate your Medal folder
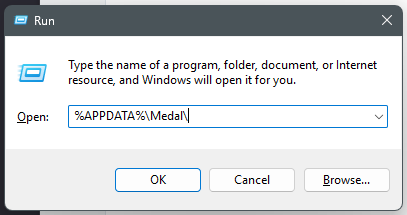
Press Windows Key + R
- Type: %APPDATA%\Medal
Press Enter
Note: If you’ve used multiple accounts on the same PC, you may see multiple medal-
Step 2: Back Up Your Clips
Back up all medal-{userID}.db file(s)
Save these files somewhere safe (e.g., Desktop or external storage).

Step 3: Uninstall Medal
Close Medal completely
Open Control Panel → Programs → Uninstall a program
Uninstall Medal
Step 4: Remove Remaining Files
After uninstalling:
Press Windows Key + R
Delete the following folders if they exist:
- %APPDATA%\Medal
- %LOCALAPPDATA%\Medal
- %LOCALAPPDATA%\Programs\Medal
Step 5: Restart Your PC
Restarting ensures all leftover files and processes are cleared.
Step 6: Reinstall Medal
Download and install the latest version of Medal.
You can download it here: https://medal.tv/download
Step 7: Restore Your Backup (If Needed)
After reinstalling:
- Copy your backed-up files back into:
- %APPDATA%\Medal
Important Notes
Always back up your files before purging
If your clips are already uploaded, they are safe
Local clips that are not backed up may be permanently lost if not backed up properly!
If you’re unsure which files to back up or run into issues, feel free to reach out to support.
Was this article helpful?
That’s Great!
Thank you for your feedback
Sorry! We couldn't be helpful
Thank you for your feedback
Feedback sent
We appreciate your effort and will try to fix the article